13 March, 2015

Paper Patchwork: Making Your Scraps Work for You

It hurts our hearts a little to see the remnants of a beautiful cardstock page littered with cuts and holes that seem to render it unusable. It’s a crying shame. There’s so much paper leftover, and yet none at all! “Water, water, everywhere, nor any drop to drink.” (Thank you, Samuel Taylor Coleridge.) Potential appears to be squandered. Dreams run dry. Yet we still find ourselves clinging to these scraps, hoping someday we’ll find their purpose.
But there comes a point where a crafter can simply no longer endure anguish of this magnitude—something must be done about the scraps! So, in the spirit of this month’s theme of organization, we set out to find a purpose for these bothersome scraps that are so tantalizingly lovely in their brokenness. We were determined to use them, rather than stuff them away into that easily forgotten dungeon we call “the scrap box.”
And so we did! Want to see what we came up with?
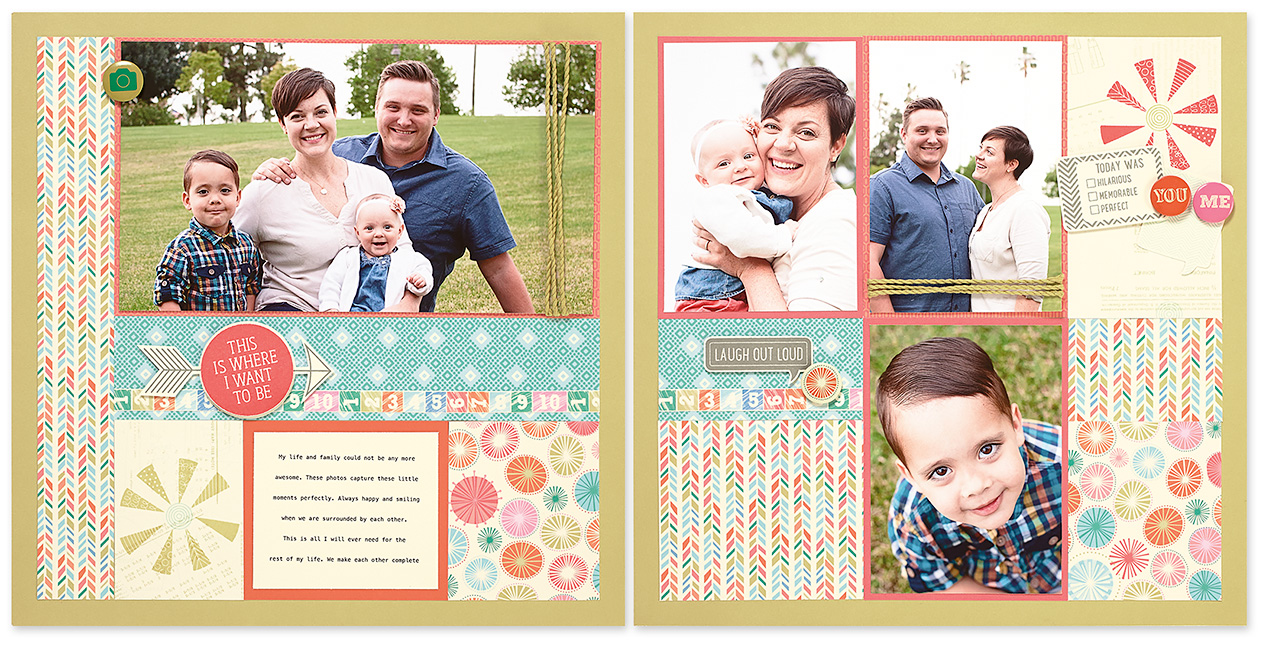
#1) THE LAYOUT
This authentic and eye-catching layout is made with scraps from ELEVEN different papers! (Check the recipe at the end of this post to see which ones.) The best part about it is that, thanks to the Cricut® overlay, we only needed small scraps of the papers to weave into the layout. The different patterns and colors working as one make for a brilliant display that proves these paper scraps are better together than they ever were apart.
Other noteworthy things we love about this layout:
  • The White Daisy ink splatters against the kraft cardstock. We love the way this adds texture and life to the spread, encompassing the repurposed and artful utilitarian nature of this layout.
  • The way the journaling is seamlessly integrated into the flow of the layout. We’re just tickled over how the journaling blends so seamlessly with the layout that it’s become another artistic feature! It also adds a dose of personality and life to the layout.
  • The creative use of the Sparkle chevron shapes. Did you notice that the lines of sparkles stemming from the photo are actually cut from Sparkle chevron shapes? Cool, right? Just one more example of how to use bits and pieces to create something beautiful..........more
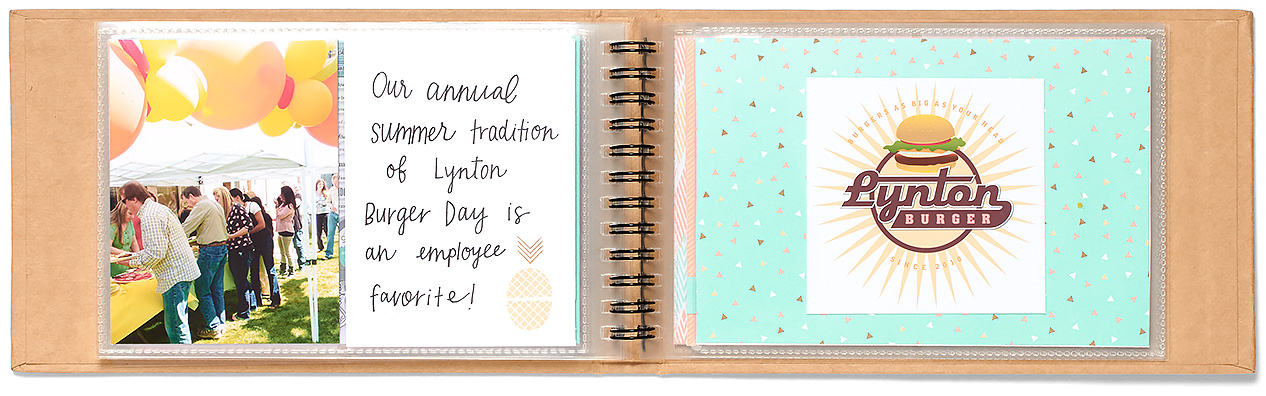
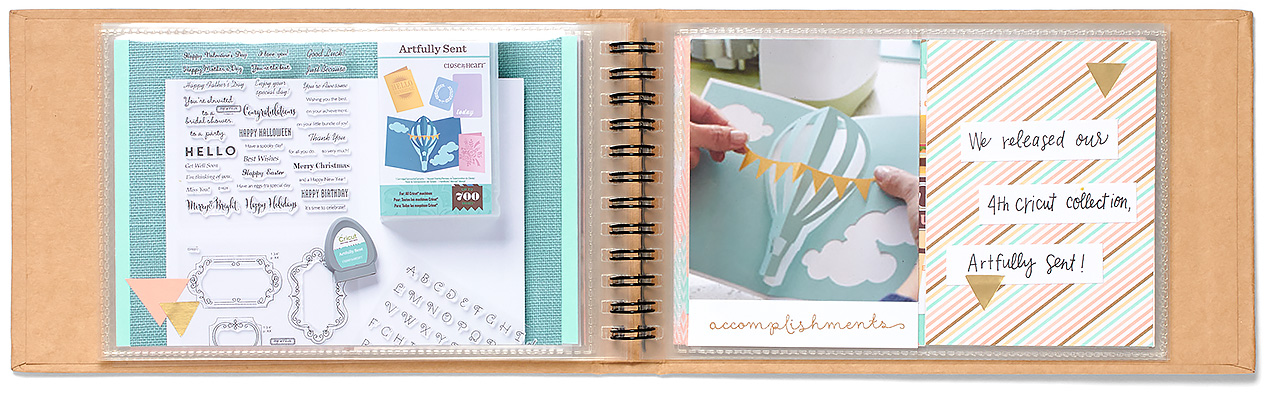
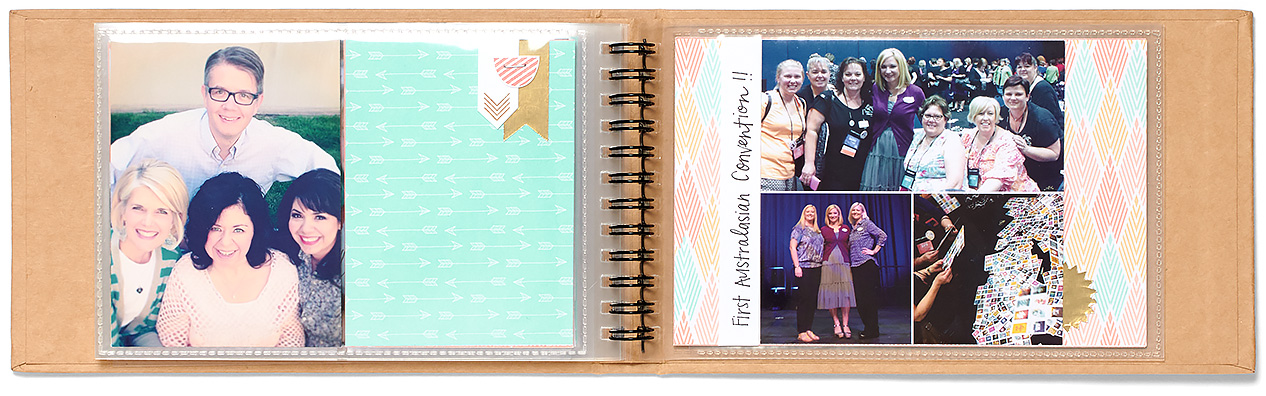
Cricut Artfully Sent: Pocket Function

The Pocket function of your Close To My Heart Cricut® Artfully Sent cartridge will spice up so much more than just your layouts. See the possibilities in this video.
Learn to use Close To My Heart’s Cricut® Artfully Sent cartridge, it is packed with beautiful and inspirational card concepts, including the “pocket” function.  You'll be blown away with what you can create using this cartridge.                                   


If you would like information about anything you see or would like to place an order or even become a consultant & join my team - please don't hesitate to send me a message at mtlamont52@gmail.com, I will be happy to help you in any way I can or purchase directly from my Online Shop & have it delivered right to your door.    I also offer scrapbooking, card making, base & bling & papercrafting classes......contact me to find out more.

08 March, 2015

Mosaic Card

I was looking through CTMH's Wishes book which has a 100 card ideas & came across a card on page 114.   I liked the mosaic look & thought it would be a great way to use up some of my leftover scraps from the Heartstrings Workshop on the Go kit (retiring at the end of the month), but what started with a simple idea ended up looking nothing like the original design.   Close To My Heart has 8 How-To Program books with 100's of scrapbooking & card making ideas along with cutting guides & fundamental design principles.

I had fun with the mosaic pieces & it's a good way to use up all your little scraps.  The frame is from the March Stamp Of The Month "Choose Happy" & I used the Watercolor Pencils to colour it in then sponged around it & inside with the Glacier Ink Stamp Pad.  The background stamp on the side is the Season of Thanks set, I used VersaMark Ink pad & embossed it with Ranger White Super Fine Embossing Powder, then I used Pixie, Glacier & Whisper ink stamp pad colours for the reverse embossing, I found these to go with the papers the best.  The little border stamp is also from the March SOTM set along with the "you're special" sentiment.

Before I put it all together I used a double sided sticky sheet & put micro fine glitter over it & burnished until it smoothed out then peeled off the backing & used it as a sticker over the top of the mosaic pattern to soften it down,  I was happy with the end result.

If you would like information about anything you see or would like to place an order or even become a consultant & join my team - please don't hesitate to send me a message at mtlamont52@gmail.com, I will be happy to help you in any way I can or purchase directly from my Online Shop & have it delivered right to your door.    I also offer scrapbooking, card making, base & bling & papercrafting classes......contact me to find out more.

06 March, 2015

A Game of Hopscotch

 There's only one month left to play with Hopscotch before recess is over! https://blogctmh.files.wordpress.com/2015/02/unknown-13.jpeg
You’re just a hop, skip, and a jump away from a playful creative awakening when you get your hands on our fun Hopscotch Background and Texture (B&T) papers. Using the Hopscotch papers is more than child’s play—it’s carefree crafting at its finest.
There are hundreds of ways to transform the hopping hexagons, sprightly sunbursts, and other popping patterns on these papers into works of art. So what’s your game plan?
One of our favorite ways to use the playful papers is with the Workshops on the Go® Hopscotch scrapbooking kit!

If you’ve used our Workshops on the Go® kits before then you’re already acquainted with the joy that comes from piecing together a gorgeous, complete scrapbook layout or collection of beautiful cards. These kits give you everything you need to complete some of the loveliest pieces on the block—wherever and whenever you wish. The only things we don’t pack into our kits are the three things you provide: your trusty paper trimmer, your adhesive of choice, and your creativity.
We don’t like to play favorites, but if we did, the spunky Hopscotch scrapbook kit from Seasonal Expressions 1 would definitely be one of them. You can’t help but love its energetic papers and eye-catching patterns—and the stamp set scores a lot of points for positivity and sheer cute factor!

https://blogctmh.files.wordpress.com/2015/02/hopscotch-stamp-set.jpeg                                                                           
So who’s in? There’s only one month left to get this goodie before it’s gone forever, so get yours from your Consultant before March is over and this game of Hopscotch includes.                          

03 March, 2015

Cricut® Artfully Sent: Sleeve Function

Layering is where it’s at! The Sleeve function of Close To My Heart’s Cricut® Artfully Sent cartridge holds dozens of options that will lend beautiful depth and complexity to your cards in a matter of seconds.
Learn to use Close To My Heart’s Cricut® Artfully Sent cartridge, it is packed with beautiful and inspirational card concepts, including the “sentiment” function.  You'll be blown away with what you can create using this cartridge. 

                                   
 If you would like information about anything you see or would like to place an order or even become a consultant & join my team - please don't hesitate to send me a message at mtlamont52@gmail.com, I will be happy to help you in any way I can or purchase directly from my Online Shop & have it delivered right to your door.    I also offer scrapbooking, card making, base & bling & papercrafting classes......contact me to find out more.

17 February, 2015

Cricut® Artfully Sent: Sentiment Function

The Sentiment function of Close To My Heart’s Cricut® Artfully Sent cartridge goes deeper than words. See for yourself what extra tricks are hidden within this fun function!
Learn to use Close To My Heart’s Cricut® Artfully Sent cartridge, it is packed with beautiful and inspirational card concepts, including the “sentiment” function.  You'll be blown away with what you can create using this cartridge.


 If you would like information about anything you see or would like to place an order or even become a consultant & join my team - please don't hesitate to send me a message at mtlamont52@gmail.com, I will be happy to help you in any way I can or purchase directly from my Online Shop & have it delivered right to your door.    I also offer scrapbooking, card making, base & bling & papercrafting classes......contact me to find out more.

04 February, 2015

Cricut Artfully Sent: Scene Function

Learn to use Close To My Heart’s Cricut® Artfully Sent cartridge, it is packed with beautiful and inspirational card concepts, including the “scene” function.  You'll be blown away with what you can create using this cartridge.


If you would like information about anything you see or would like to place an order or even become a consultant & join my team - please don't hesitate to send me a message at mtlamont52@gmail.com, I will be happy to help you in any way I can or purchase directly from my Online Shop & have it delivered right to your door.    I also offer scrapbooking, card making, base & bling & papercrafting classes......contact me to find out more.

27 January, 2015

Choosing Paper Over Pixels: Why We Still Scrapbook


http://1.gravatar.com/avatar/0b2622dfcce2280320b46901e861b4fe


Originally posted on Make It from Your Heart: January 23, 2015
 
With the end of the old year and the dawn of the new year, I’m sure you’ve seen your fair share of “Year in Review” posts floating through your Facebook newsfeeds. Some people argue that things such as this have replaced scrapbooking layouts and albums. This is the new scrapbooking, they say. We no longer turn pages; we scroll them. So why then do some of us continue to use paper to preserve our memories? Is scrapbooking with paper still important? Well, let me tell what I think.
The things that pop up in our newsfeeds often become irrelevant within mere hours of being born. Their permanence is as fleeting as dust in the wind. People will click through maybe once or twice, but after that, few will even remember they were there. When we upload pictures to Facebook, it fails to leave us with the same sense of satisfaction that comes from the whiz of a paper cutter or the stickiness of fingers spotted with adhesives. And when we type out our words, we lose the intimacy of handwriting and the beautiful way a personality dances its way through the shapes of the letters.
This is why I love National Papercrafting Month. It’s a wonderful reminder at the beginning of the year of why I fell in love with scrapbooking in the first place. It reminds me why we still spend time preserving memories with paper in a world that is slowly turning into pixels.
Working with paper will ground you in reality and in the beautiful subtleties of our physical world, which is why I think the Year >> Noted kit is so nicely suited to this month. In the rush of a new year and the memory of an old year, it not only keeps me grounded, but also gives me a place to tether my dreams, making my big goals seem so much more in reach!
Life is a continual cycling of beginnings and endings—don’t get lost in the whirlpool. Take the time to write down those things within your heart that will one day become the whispers of your past. Ground yourself in paper. Because when you hold a real, finished project in your hands, the rush and the hurry fades away and the only thing you feel is contentment.
And trust me, when this new year becomes old and the time comes to reflect, you’ll be happy you have something real to hold and to remember. Let this kit become a time capsule filled with little pieces of who you are in this moment. I promise you that when you take the time to remember, your heart will fill with gratitude for not only who you are, but also for who you are becoming.
Happy scrapbooking!
from Jeanette Lynton

26 January, 2015

Cricut Artfully Sent: Pop-up Cards with Icons


Another card from the Artfully Sent cartridge, I was inspired by another card on Patricia Manhire's blog, she is a very talented consultant from New Zealand.   I just had to make it, the cage & insert layer are found on page 13 of the Artfully Sent cartridge, I just love birdcages & flowers so this was fun to do.
The cage is cut from a colour in the Paper Fundamentals Whimsy Assortment pack, the flowers from the It's the Little Things stamp set are stamped tone on tone & colour on white, they are cut out individually & placed on top of each other some with 3-D foam tape so I could layer them.  Inks I used are Canary, Pixie, Gypsy, Topiary (this is my favourite colour to use for leaves) & Glacier.  For some added texture I embossed the Glacier insert with the Woodgrain Embossing folder.  For the finishing touches I use Durables Artisan Studs on the feet of the cage & for some extra bling I used the Bling Gems Gold assortment & Bitty Sparkels on the flowers.


Take a look at some eye-popping cards made with the Pop-up and Icon functions of Close To My Heart’s Cricut® Artfully Sent collection.                           

23 January, 2015

The 7 Habits of Highly Effective Photographers

http://1.gravatar.com/avatar/0b2622dfcce2280320b46901e861b4fe
 Originally posted on Make It from Your Heart: January 12, 2015


So you want to learn how to take good photos, do you? You’re not alone. With technology these days, it seems like it would be pretty much impossible to take a bad picture, yet we all end up with our fair share of photos that make us cringe. The red eyes, the shadowy faces, the artwork shots that look like they were taken in a cave—we’ve all been there. But the good news is there’s hope! With a little knowledge, you can take your photos from blah to brilliant and upgrade your layouts and blog posts from meh to marvelous. Let’s get started.

 
Learn the power behind the buttons.All of the bells and whistles on your camera may seem overwhelming at first, but if you take a few moments to sit down, read the guidebook, and master a few key features, your pictures will reap the benefits. It won’t take any longer than scrolling through Facebook or watching an episode of your favorite sitcom. Plus, you will likely be able to find helpful tutorials through online outlets, like YouTube.
Be conscious of lighting.
When it comes to lighting amateur photos, the natural light of the sun is your best bet. But channel this power wisely. Always make sure the light is indirect. Try to take photos near a window, an open door, or even a covered porch. When possible, avoid using your flash—it can make things look flat and just plain unnatural.
Pay attention to backgrounds.
Hanging laundry? Bad. Cozy fireplaces? Good. Pay attention to what’s lurking in the background of your photos. Whatever it is, it’s more noticeable than you think.
Keep the props simple and meaningful.
Remember that the reason you’re taking the picture in the first place is to highlight your subject! Don’t lose track of the subject by overloading the photo with unnecessary props and clutter. A few simple and visually enticing props, such as a string of ribbon or a vase of flowers, are all you need to capture the right mood.
Get up close and personal.
Don’t be afraid to get cozy with your subject, whether it’s your artwork, your child, or the cat from next door. Let the subject take up the majority of the frame. If your subject is human, hold the camera at their eye level to capture the full force of their gaze.
Be patient enough to snap lots of photos.
Thanks to the advent of digital photography, we no longer live in a day when we have to fret about how many exposures we have left. Take advantage of this freedom and snap away! Have the patience to keep taking pictures and adjusting as you go until you capture just the right shot.
Edit your photos after you take them.
Photo editing software programs can perform visual wonders in mere seconds. If you don’t want to lay down the big bucks for programs like Adobe® Photoshop®, try free services like picmonkey.com. For smartphones, try apps like Snapseed or PicTapGo. Even just a few tweaks—like brightening and sharpening your photo—can make a world of difference.
With all that being said, always remember that you are the photographer so your photos should reflect your unique perspective. Keep these basic guidelines in mind, but don’t be afraid to follow a gut instinct or pursue a wild idea. Photos are their own special form of art, so get creative! Start from right where you are and remember that every professional was once an amateur.

22 January, 2015

Christmas Tea Lite Card

I got the idea of this card at one of our consultant crop days last year I think, but can't remember who was the clever girl that made up a sample.
I thought it would look good as a Christmas Card.  I cut a piece of Colonial White cardstock 5.5" x 12" & scored at 3" & 6" folding both as mountain folds to form the base of your card.  I cut out a 2.5" circle in the top, then cut a a larger circle in vellum,  I used Whisper & then shadowed the White Daisy exclusive inks for the sentiment from the Merriest Christmas Stamp set.
I cut a 6" x 5.5" piece of B&T paper out from the Yuletide WOTG Kit for the base section, the Poinsettias are cut from the Cricut Artiste Cartridge - page 73 in various sizes to make the leaves & flowers.  I used Cranberry & Topiary cardstock, stamp random patterns all over the flowers, wet them, crunched them up & when dry shaped the flowers & glued together with Liquid Glass (my favourite thing to use).  The Reindeer is cut from the Cricut Artbooking cartridge in Black cardstock.  You can decorate rest of card as you wish with bling, I used the gold shimmer trim as a border & the Bling Gems Gold assortment on the flowers with a little red gem for his nose.
And of course finish off with the tea lite candle behind the vellum.  I was happy with how it turned out.

If you would like information about anything you see or would like to place an order or even become a consultant & join my team - please don't hesitate to send me a message at mtlamont52@gmail.com, I will be happy to help you in any way I can or purchase directly from my online shop & have it delivered right to your door.    I also offer scrapbooking, card making, base & bling & papercrafting classes......contact me to find out more.

21 January, 2015

Cricut® Artfully Sent: The Basics

 Learn to use Close To My Heart’s Cricut Artfully Sent Cartridge.  Pop on over to my online shop & take a look at this & many other handy tools to make your crafting life easier.


I haven't had the chance to play with the new Artfully Sent Cricut cartridge yet as much as I want to but I did manage to make 2 cards after being inspired by another crafty consultant Patricia Manhire.  There are so many ideas on Pinterest & other crafty blogs & websites to get motivated. This card is found on page 47 of the booklet & cut at the recommended sizing.  I used Glacier cardstock for the base of the card, White Daisy Cardstock for the insert.  I used Santa Claus C1567, Always Grateful C1559 & Merry & Bright (retired) stamp sets.  I'm still trying to master the sponging effect but am getting there, I used Glacier, Indian Corn Blue & Pacifica & Pixie ink pads for the backgrounds, Ponderosa Pine for the trees & Chocolate for Santa & Sleigh. To get the illusion of mountains I got a white piece of cardstock & ripped it into shapes I wanted & used them as a mask for stamping.  I used glitter under the snowflake cutout but CTMH Glitter sheets would look beautiful as well for that bit a bling that's needed.

I have finished off the card with a sentiment on the front & some White Enamel Stars.


My take on the card that was featured in the tutorial for using the All Purpose Mat & mixing inks together.  The Deer & Rabbit can be found on page on page 12 & the background on page 5 of the booklet.  I cut off some of the tree trunks & changed the sentiment.  
Go to the post dated 6th November 2014 to see original card.
Always add your own spin on cards & get inspired by everything & everyone.


  If you would like information about anything you see or would like to place an order or even become a consultant & join my team - please don't hesitate to send me a message at mtlamont52@gmail.com, I will be happy to help you in any way I can or purchase directly from my online shop & have it delivered right to your door.    I also offer scrapbooking, card making, base & bling & papercrafting classes......contact me to find out more.
              

01 November, 2014

Washi Tape Christmas Bauble

Another quick & easy card to add to your stash is this
Christmas bauble using washi tape.  Washi tape is very forgiving & if you don't line it up the first time then you can carefully lift it up again & re stick it.  Our embossing folders are fantastic, they have deep impressions so there is no need to put them through the Cuttle Bug or Big Shot more than once.  I just love my Big Shot, it's such a sturdy machine & it gets alot of use.    I used a ShinHan marker to colour in the clear sparkles to match ink.    This card inspired by Sue-Ellen Robertson.                                                                                                                                       
The following products I have used are:-  White Card & Envelope Value Pack X254,   Chevron Embossing Folder Z1925, Gold Polka-Dot Washi Tape Z1920, Ruby Chevron Washi Tape Z1933,  Bronze Shimmer Trim Z1849, Santa Claus Stamp Set C1567, Silver Shimmer Trim Z1799, Cranberry Cardstock 1272, White Daisy Cardstock 1385, Sparkles Clear Assortment Z1752, Carmine ShinHan Touch Twin Marker Z2448 & Cranberry Exclusive Ink Pad Z2116.                                                                                                          
If you would like information about anything you see or would like to place an order or even become a consultant & join my team - please don't hesitate to send me a message at mtlamont52@gmail.com, I will be happy to help you in any way I can or purchase directly from my Online Shop & have it delivered right to your door.    I also offer scrapbooking, card making, base & bling & papercrafting classes......contact me to find out more.

31 October, 2014

My Birthday Cards

I feel very fortunate to have such beautiful friends & family.   It was my birthday last week & I received some pretty amazing handmade cards.  So here they are:  Joan, Karen, Janise, Pamela, Lee-Anne, Wendy J, Sue & my sister Wendy, aren't they just gorgeous.


30 October, 2014

Yuletide Carol & Snowhaven Cards

With Close To My Heart I belong to a very talented group of ladies from all over Australia.   We help each other, share ideas & give inspiration.   Inspired by Margaret Moroney. These were a hit with my workshop ladies who broke out & started using this pattern for birthday & other cards.


The papers used are from the Yuletide Carol X7187B & Snowhaven X7188B Paper Packs (you use 4 of the front & 4 from the back to make the pattern), these 2 packs are so versatile you could even use them or other projects other than Christmas, it's only your imagination.

Embellishments used were Bling Gems Gold Assortment Z2023, Gold Shimmer Trim Z1985, Ruby Cardstock X5927, White Daisy Card & Envelope X254, Colonial White Card & Envelope X1410, Desert Sand Cardstock 1273,  Desert Sand Ink Pad Z2118, Stripe Embossing Folder Z1960, Quatrefoil Embossing Folder Z1926, the Merry Christmas from Holiday Tags Stamp Set D1560, White Daisy Cardstock 1385 & Colonial White Cardstock 1388.

If you would like information about anything you see or would like to place an order or even become a consultant & join my team - please don't hesitate to send me a message at mtlamont52@gmail.com, I will be happy to help you in any way I can or purchase directly from my Online Shop & have it delivered right to your door.    I also offer scrapbooking, card making, base & bling & papercrafting classes......contact me to find out more.

13 September, 2014

Using Overlays

When you cut out overlays from the Cricut Artbooking Collection Cartridge, you can use both the positive & negative cuts to create a double page spread.   With this cartridge you get oodles of images in each of 15 layout themes, you can create several coordinating pages for each theme using just two keys and one dial size. Images include accents, borders, titles, overlays, photo mats—in standard photo sizes!—and more. The Cricut® keys are optimized for creating 12" × 12" pages in a jiffy.  There are also lots of coordinating stamp sets to  use after you finished your cutting.

Another sample of an overlay

If you would like information about anything you see or would like to place an order or even become a consultant & join my team - please don't hesitate to send me a message at mtlamont52@gmail.com, I will be happy to help you in any way I can or purchase directly from my Online Shop & have it delivered right to your door.    I also offer scrapbooking, card making, base & bling & papercrafting classes......contact me to find out more.

10 September, 2014

Family is Forever


I used September's Stamp of the Month S1409 Family is Forever.
You can earn this exclusive stamp of the month in September when you place an order of $75 or more in Close To My Heart products with me or from my Online Shop.
This little stamp set has many possibilities for so many occasions.   Other CTMH products I used are new colours Pixie Z2644, Glacier Z2641 & Saddle Z2171 exclusive stamp pads, the new ShinHan touch twin markers Carmine Z2448, Mahogany Z2456 & Sap Green Z2463, Cardstock colours are Canary X5772, White Daisy 1385 & Lagoon X5762, Brushed paper pack X7190B, Teal Shimmer Trim Z1918.  The tree was stamped, cut & then coloured, the little hearts are part of the tree & just coloured Carmine & stuck down while the little dotted heart is from the retired For Always Stickease assortment.
The stamped hearts were cut on the cricut machine using the Artiste cartridge.

If you would like information about anything you see or would like to place an order or even become a consultant & join my team - please don't hesitate to send me a message at mtlamont52@gmail.com, I will be happy to help you in any way I can or purchase directly from my Online Shop & have it delivered right to your door.    I also offer scrapbooking, card making, base & bling & papercrafting classes......contact me to find out more.

22 August, 2014

Adhesives

Learn to use Close To My Heart's array of adhesives, Bonding Memories Glue, Memory Book Glue Dots, 3-D Foam, Hook & Loop Dots & much more.  Pop on over to my online shop & take a look at this & many other handy tools to make your crafting life easier.


If you would like information about anything you see or would like to place an order or even become a consultant & join my team - please don't hesitate to send me a message at mtlamont52@gmail.com, I will be happy to help you in any way I can or purchase directly from my Online Shop & have it delivered right to your door.    I also offer scrapbooking, card making, base & bling & papercrafting classes......contact me to find out more.

21 August, 2014

Embossing is Back!

 Learn to use Close To My Heart's embossing tools.  Pop on over to my online shop & take a look at this & many other handy tools to make your crafting life easier.


With a My Acrylix™ stamp set
and your embossing tools, you
can add not only visual content
but also real texture to your
projects. Choose a colour from our
new collection of embossing
powders to create intricate detail
on all your projects. The gold
used here contributes an ageless
look to a 6" x 6" canvas popping
with trendy colours and patterns.


If you would like information about anything you see or would like to place an order or even become a consultant & join my team - please don't hesitate to send me a message at mtlamont52@gmail.com, I will be happy to help you in any way I can or purchase directly from my Online Shop & have it delivered right to your door.    I also offer scrapbooking, card making, base & bling & papercrafting classes......contact me to find out more.

20 August, 2014

Punches & Corner Rounder

Learn to use Close To My Heart's punches and corner rounder.  Pop on over to my online shop & take a look at this & many other handy tools to make your crafting life easier.


If you would like information about anything you see or would like to place an order or even become a consultant & join my team - please don't hesitate to send me a message at mtlamont52@gmail.com, I will be happy to help you in any way I can or purchase directly from my Online Shop & have it delivered right to your door.    I also offer scrapbooking, card making, base & bling & papercrafting classes......contact me to find out more.