08 April, 2014
Floating Your Fancy
Get the most out of Close To My Heart's Cricut® Artbooking cartridge
with these fun home décor ideas. Create decorative floating frames and
functional message boards quickly and easily. Contact ME your Independent
Consultant for more information.
Products Used
Z1906 Cricut Artbooking Collection
Z1279 Versa Mat
X5635 Topiary Cardstock
X5639 Sweet Leaf Cardstock
X5666 Twilight Cardstock
X7183B Lollydoodle Paper Packet
Z2117 Crystal Blue Exclusive Ink Stamp Pad
Z2160 Twilight Exclusive Ink Stamp Pad
Z2193 Cotton Candy Exclusive Ink Stamp Pad
Z2190 Gypsy Exclusive Ink Stamp Pad
04 April, 2014
30 March, 2014
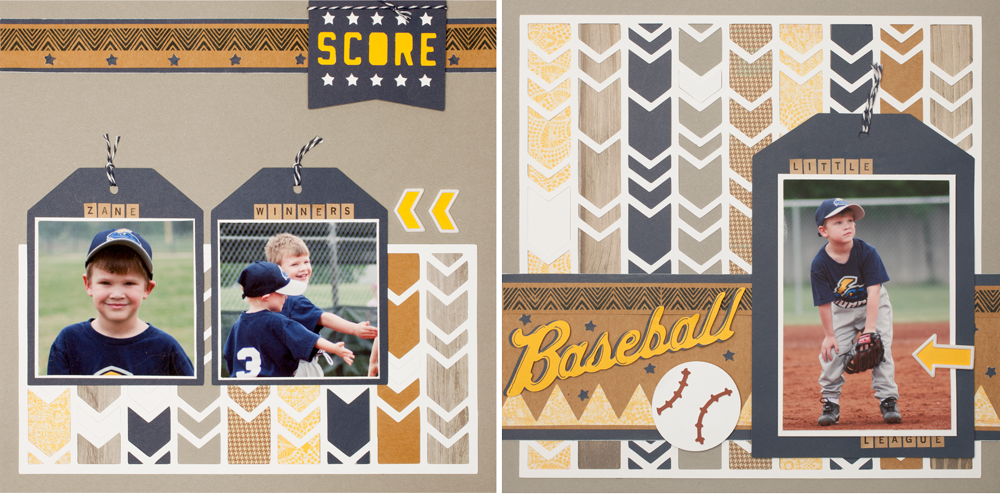
Artbooking Made Easy: All-Star Scrapbooking
No matter if you’re a baseball, football, basketball, or
soccer fan, or just know someone who is, you’re going to want to cheer
for
today’s episode of Artbooking Made Easy! We’re going to be looking at
the teamwork layout keys found on pages 82 and 83 of the Artbooking
booklet. The pennant banner, chevron
overlays, star border, and teamwork sentiment cutouts will leave you
wanting to do a victory dance! Contact ME your Close To My Heart Independent Consultant for more details.

Let’s take a time-out from layouts and move over to home
décor. I love simple pieces of home décor, and it’s always a bonus when it’s
something you get to decorate yourself!
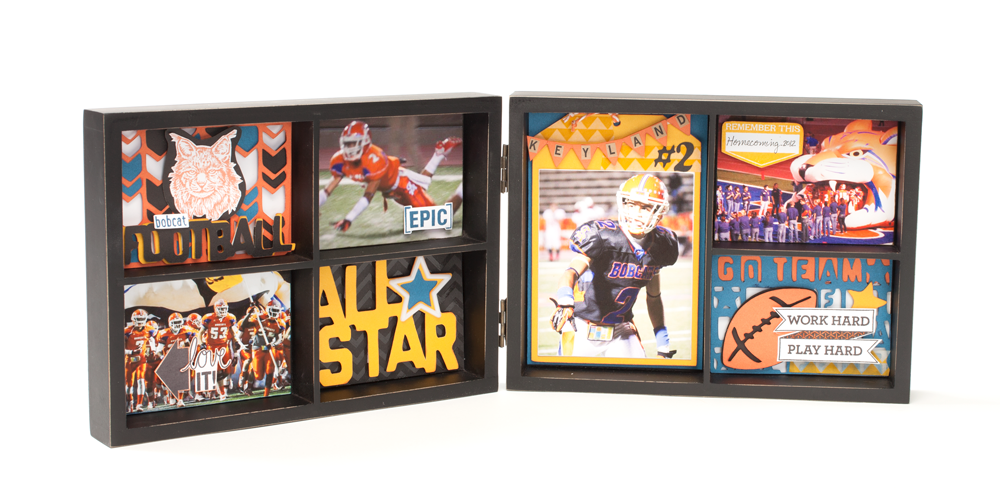
For soccer balls, basketballs, and baseballs, the circle
shape on page 83 is perfect for backing the cutout in a solid shape of a different
color. To get that exact football shape, though, you can either just cut the
solid shape out by hand, or use the “hide contour” button with Cricut Craft
Room® to hide the middle cutouts for a solid base shape.

Let’s take a closer look at the title here. The artist cut
it out twice, once in Honey and once in Outdoor Denim, and then layered it to
give it the shadow effect. She went one step further and added in that extra
detail with a journaling pen, and the result is a home run in my book!
Also, look at how the artist has used the banner
border—upside down! It blended in so well with the other elements on the page
that I almost missed it, but it’s definitely a winning element on this page,
especially since it’s used in a way that you wouldn’t expect.


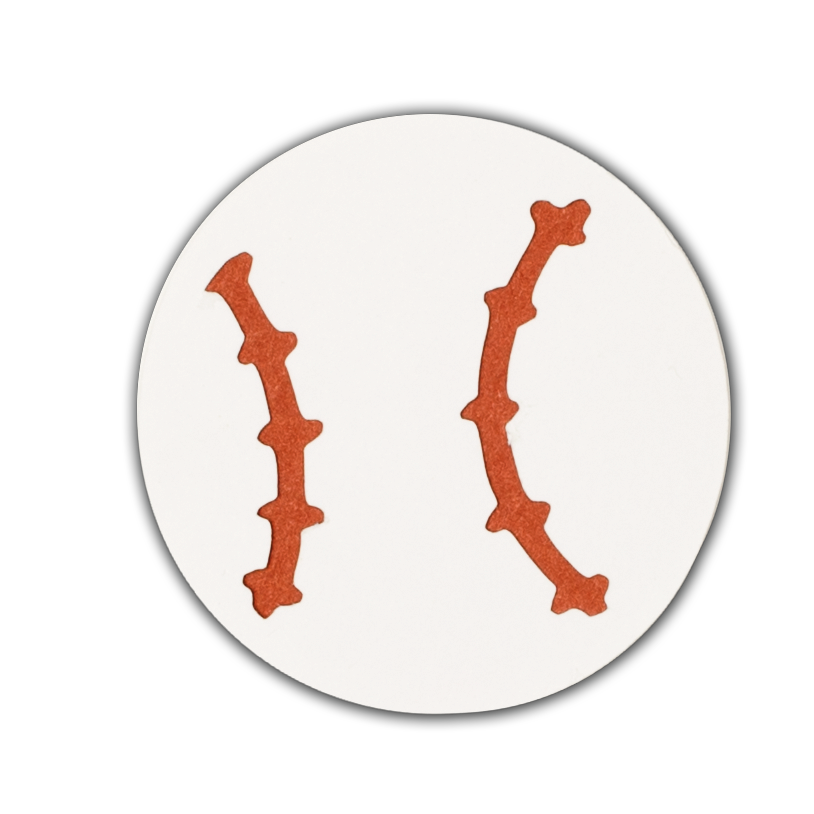
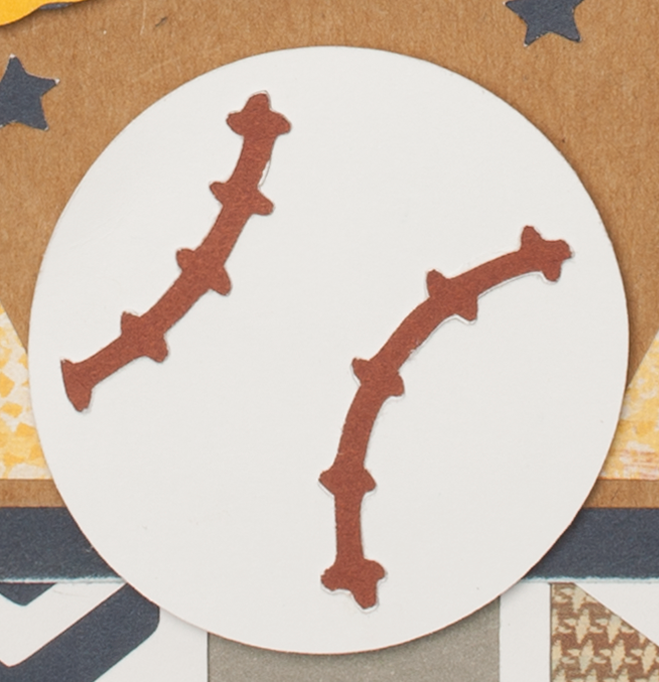
One thing I want to point out with the baseball, as well as
the other balls on the teamwork layout keys, is that there are two ways to cut
out these shapes. For example, with the baseball, you can either cut out the
shape in white and lay it on top of a red circle to have the stitches show
through from underneath (the baseball shown here on the right), or you can cut out the shape in red and lay the cutouts
of the red stitches on top of a white circle (the baseball on the left). Whichever look you prefer!
Let’s take a time-out from layouts and move over to home
décor. I love simple pieces of home décor, and it’s always a bonus when it’s
something you get to decorate yourself!
For soccer balls, basketballs, and baseballs, the circle
shape on page 83 is perfect for backing the cutout in a solid shape of a different
color. To get that exact football shape, though, you can either just cut the
solid shape out by hand, or use the “hide contour” button with Cricut Craft
Room® to hide the middle cutouts for a solid base shape.
One little tip as you’re using your Cricut®
machine for smaller, intricate cutouts: try using the “flip” function key to
cut out your shapes in the mirror image. This will often give you cleaner cuts,
especially on the front side of your shapes. Just make sure that if you’re
using the double-sided B&T papers, you load the side you want to show face
down on the cutting mat.
Recipes
Baseball Layout:
Z1906 Cricut® Artbooking Collection
B1452 My Acrylix™ Funky Blossoms
X7181B Jubilee Paper Packet
X7182B Timberline Paper Packet
Z1751 Baker’s Twine Harvest Assortment
Z1825 Keyboard Kraft Alphabet
Z1961 White Marquee Enamel Shapes
Colors used: Slate, Outdoor Denim, White Daisy, Honey, Barn
Red, kraft
Hinged Display Tray:
Z1906 Cricut® Artbooking Collection
B1431 My Acrylix™ Reel Life
C1575 My Acrylix™ True to Life
C1573 My Acrylix™ Do Your Best
Z1939 Paper Fundamentals Basics Assortment
Z1751 Baker’s Twine Harvest Assortment
Z1961 White Marquee Enamel Shapes
Colors used: black, White Daisy, Sunset, Honey, Pacifica, Slate28 March, 2014
Artbooking Made Easy: Trailblazing Travel Albums
You can document that unforgettable vacation, getaway, or outing with the travel
keys on Close To My Heart's Artbooking cartridge. From artsy airplanes
to ticket-like tabs, there are cutouts to accompany any of your
travel-themed crafts. Today's Artbooking Made Easy is
all about the travel mini-album keys. These keys are found on pages 38 and 39
of the Artbooking booklet, so let’s take a look! Contact ME your Independent Consultant for all the
details!
Products Used:
Cricut Artbooking Collection Z1906
Timberline Assortment Z3005
Topiary Mini Chevron Ribbon Z1929
Base & Bling Craft Queen Charms Z1958
Black & Grey Epoxy Bubbles Z1935
I love how versatile the Artbooking
cartridge is—from just two pages of keys, we saw three totally different looks.
Use your favorite colors, embellishments, and shapes to make your projects your
own! Let me show you some of the details to inspire you.
I really love the simplicity of this page. Using kraft
cardstock, the artist cut out the little geolocation icon and the airplane, and
then, using the scallop border punch, created a simple border with the White
Daisy and Goldrush cardstock. I love how the look of the scalloped borders
matches the shape of the clouds on the next page. Sometimes using simple shapes
ties things together nicely. If you have a favorite shape or cutout you’re
using, experiment to see what other shapes or borders might coordinate with it.
This overlay from page 39 of the booklet looks great sized
down for this card, but I especially love how the artist has decorated it with
a unique twist on baker’s twine! These little wheels are easy to create, and I
love the way they match the circles on the overlay, the border, and the
center of the flowers. And of course, baker’s twine is typically used for tying
bows or wrapping around paper, so I love seeing embellishments used in a way
you don’t see very often! All you need to create these wheels is some Liquid
Glass (or Glue Dots). Apply a circle of Liquid Glass to your paper, and then
take your baker’s twine, adhering the end to the center of the circle, and just
wrap your way around. Because the baker’s twine already has a twisted design,
wrapping it into wheels creates a great multi-dimensional look.
From the "Our Vacation" album, these washi tape ruffles are just too adorable! They add such a
fun element to these pages, and they’re so simple to make. Just put two pieces
of washi tape together (so that the adhesive sides stick together), fold to
create the pleat, and staple one side down along the edge. You can hide the
stapled side behind another piece of paper, or just leave it exposed—however
you’d like.
If you love the colors of your plain cardstock but want to
give it more visual interest, you can always use the same color of ink to stamp
backgrounds onto your solid-colored cardstock. The good thing about creating your own
patterned paper using stamps is that you control how it looks—you can stamp
several times to create a lot of contrast, or you can stamp it lightly to just
give a hint of a pattern.
Another thing I love about this page is how the artist used the "Just Be" title in her own way to create a new title! Use your imagination to see what new titles you can come up with.
What inspiring artwork! Feel free to adapt and adjust some
of these techniques to work for your own projects.
To see the full list of products used to make these 3 projects visit Jeanette Lynton's site
27 March, 2014
New Heights Abound
Find out how to make your scrapbook pages shine with a sparkly bouquet
of balloons, by combining embellishments, Close To My Heart's Cricut®
cartridge cutouts, and specialty paper. Contact ME your Independent Consultant for more details or attend one of my workshops, I'd love to see you.
Products Used:
Flamingo Dots Z1934
Purple Glitter Gems Z1936
Pink Glitter Paper Z1922
Liquid Glass Z679
Cricut Artiste Collection Z1790
Versamat Z1279
Piercing Tool Kit Z1114
Ideas Book WC1141AZ
26 March, 2014
Tee Pee Card
This was a fun card to make, not sure where the original design came from but a friend of mine gave me the idea when she sent it to me as a Christmas card. I thought this might make a lovely Mother's Day Card. Come along to one of my workshops & you can learn how to make this card.
Products I used:Skylark Workshop on the Go Kit G1072
Sparkles Clear Flourishes - Small Z1812
Purple Glitter Gems Z1936
CTMH Cricut Artiste Cartridge Z1790
March Stamp of the Month - Happy Place S1403
You can get this stamp for just $5 in March when you place a qualifying order of just $75. This is a $24 stamp for just $5, available at my Online Shop
Lagoon Exclusive Inks Stamp Pad Z2195
Northern Lights Card
My version of the Northern Lights Cards that have been going around You Tube.
I am teaching this technique on Saturday 29th March at my workshop, so come along if you want to learn how to make these cards, it is very easy.
Products I used:
Always Grateful My Acrylix Stamp Set C1559
Black Cardstock 1386
White Daisy Cardstock 1385
Silver Shimmer Trim Z1799
Bronze Shimmer Trim Z1849
Chalk Marker Z1767
Bitty Sparkles Z1263
Sparkles Clear Assortment Z1752
I used a frame set for the Big Shot machine to do the frame on the top card as well as embossed the trees.
I am teaching this technique on Saturday 29th March at my workshop, so come along if you want to learn how to make these cards, it is very easy.
Products I used:
Always Grateful My Acrylix Stamp Set C1559
Black Cardstock 1386
White Daisy Cardstock 1385
Silver Shimmer Trim Z1799Bronze Shimmer Trim Z1849
Chalk Marker Z1767
Bitty Sparkles Z1263
Sparkles Clear Assortment Z1752
I used a frame set for the Big Shot machine to do the frame on the top card as well as embossed the trees.
21st Card
Products I used:
Hollyhock cardstock 1246
Pink Glitter Paper Z1922
Brown & Tan Glitter Paper Z1830
Black & Grey Glitter Paper Z1829
Sanding Kit Z1294
Cricut Art Philosophy Collection Z1686
For Always Paper Pack
Love Life My Acrylix Stamp Set D1482
Sparkles Black Flourishes Z1745
The border I sanded with the CTMH sanding kit. The border I did using the Cuttlebug Border Organic Flourish set. The shoe is an internal design in the Cricut Expression 2 machine.
The sentiment is a computer generated one printed on Hollyhock cardstock.
The frame is from the Cricut Art Philosophy cartridge as is the gold key.
This is my version of a card that was made by another CTMH Consultant Lauren Austin.
18 March, 2014
Artbooking Made Easy: Top Secret
I have always loved any way of preserving memories, and
keeping a journal is certainly one of the best ways to make precious memories last.
But for many of us, journaling began back in the days of diaries that had a
lock and a key in order to protect the secrets hidden within. Keeping secrets
seemed so important as a child! But the secret is out on this episode of
Artbooking Made Easy, which features the top secret mini album keys on pages 42
and 43 of the Artbooking booklet.
The secret is out! We love the Cricut® Artbooking cartridge from Close
To My Heart. The shapes on the top-secret--themed mini album keys are
perfect for scrapbooking your big ideas and big adventures! Contact ME, your
Independent Consultant to learn more.
Products Used
My Life Mini Album:
Z1906 Cricut® Artbooking Collection (cutouts and
stamps)
C1575 My Acrylix™ True to Life
D1580 My Acrylix™ Catch You Later
M1026 My Acrylix™ Dotted Love
E1027 My Acrylix™ Framework Alphabet
C1581 My Acrylix™ Inspiration Flourishes
C1574 My Acrylix™ Believe in Yourself
X7177B Skylark Paper Packet
Z1849 Bronze Shimmer Trim
Z1853 Aqua Dots
Z1918 Teal Shimmer Trim
Z1921 Baker’s Twine Neutral Metallic Assortment
Z1925 Chevron Embossing Folder
Z1928 Durables Triangle Studs
Z1933 Ruby Chevron Washi Tape
Z1934 Flamingo Dots
3174 Blending Pen
Colors used: Lagoon, Colonial White, Sweet Leaf, Juniper,
Smoothie, Outdoor Denim, Blush, Chocolate, Desert Sand, kraft
Z1906 Cricut® Artbooking Collection
B1431 My Acrylix™ Reel Life
C1575 My Acrylix™ True To Life
X7181B Jubilee Paper Packet
Z1921 Baker’s Twine Neutral Metallic Assortment
Z1931 Honey Triangles Washi Tape
Z1806 Green & Blue Epoxy Bubbles
Z1753 Sparkles Brown & Tan Assortment
Z1852 Stitch Guide
Z1204 Bone Folder
Colors used: Topiary, White Daisy, Cocoa, Honey, Cranberry,
Indian Corn Blue17 March, 2014
Artbooking Made Easy: Fab Frames
Decorate picture-perfect pennant frames using Close To My Heart's
Cricut® Artbooking cartridge. From flowers to snowflakes to titles, you
will love the versatility, ease, and look of these artistic
embellishments. This Artbooking Made Easy offers some wonderful ideas about giving your walls a
face-lift, too! Take a look. Contact ME your Independent Consultant for more
information.
The base
pennant-shaped cutout is found on page 76 (Photo Mat 2), cut at 9.5" Real Dial Size to fit the frame perfectly.
This sweet frame just melts my heart. I love how the border from page 40
of the Artbooking booklet matches the pink herringbone-patterned paper.
What I love about the Artbooking cartridge is that the
elements are so adaptable. You can mix and match sentiments and shapes from
different keys—for example, the “sweet” and the “girl” titles together—to
create a seamlessly harmonious piece of art.
Inside the frame, you can see some great elements also. With
Circuit Craft Room®, you can use the “hide contour” button to hide
the sentiments on the pennants from page 40, leaving you these little pennants
that you can label yourself. I also love that adorable paper clip found on page
47 of the Artbooking booklet. Paired with an acrylic flower from the Ivy Lane
assortment, it’s the perfect accent to that precious photo.
If your sweet girl isn’t quite so girly, this kind
of color palette is the perfect solution. With more of an outdoorsy feel, these
colors and elements are still elegant and feminine with the shapes from the
Artbooking cartridge. With the lacy, doily-like stamps and prints, and the paper
rosette, it’s just enough to offset the masculine feel of the woodgrain base
color.
I love this border! Using the border on page 47 of the
Artbooking cartridge, the artist first used just a plain border straight across
the frame. For the top lace border, she used two border cutouts attached
together and pleated with a bone folder to make it really stand out. So lovely!
The great thing about the snowflake overlay on page 76 is
that the negative space is lots of little snowflakes, all in various sizes. Or
you can choose to cut out the individual snowflakes to get the exact size you
need.
I love how the artist has layered these two snowflakes to
give it more dimension. And you can see how she used just a few drops of white
re-inker to add some fun snow detail. The silver and pink sparkles throughout
the frame really help tie those little elements all together.
Sweet Girl Frame:
Z1906 Cricut® Artbooking Collection
B1443 My Acrylix™ Hello Wonderful
Z1941 My Creations™ Pennant Frame
X7178B Ivy Lane Paper Packet
Z3001 Ivy Lane Assortment
Z1936 Purple Glitter Gems
Z1807 Pink Glitter Gems
Colors used: White Daisy, Smokey Plum, Sweet Leaf
My Girl Frame:
Z1906 Cricut® Artbooking Collection (cartridge
and stamps)
B1416 My Acrylix™ Keyboard Uppercase
X7181B Jubilee Paper Packet
X7182B Timberline Paper Packet
Z1941 My Creations™ Pennant Frame
Z1753 Sparkles Brown & Tan Assortment
Z1263 Bitty Sparkles
Z1816 Durables Artisan Studs
Z553 Bonding Memories Glue
Z1151 3-D Foam Tape
Colors used: Colonial White, Indian Corn Blue
Brrr Frame:
Z1906 Cricut® Artbooking Collection
B1416 My Acrylix™ Keyboard Uppercase
Z1941 My Creations™ Pennant Frame
X7183B Lollydoodle Paper Packet
Z1928 Durables Triangle Studs
Z1799 Silver Shimmer Trim
Z1263 Bitty Sparkles
Z1807 Pink Glitter Gems
Colors used: Whisper, Slate, Cotton Candy, White Daisy
16 March, 2014
The Whole Kit & Caboodle
No matter your style, there's something in the new lines of paper from
Close To My Heart just for you! Watch the video to get an eyeful of
these fun and colorful packets, along with awesome artwork you can
create with them! Contact ME your Independent Consultant for more
information.
Products Used
Products Used
G1072 Skylark Scrapbooking Kit
G1073 Ivy Lane Scrapbooking Kit
G1074 Ariana Scrapbooking Kit
G1075 Balloon Ride Scrapbooking kit
G1076 Jubilee Scrapbooking Kit
G1077 Timberline Scrapbooking Kit
G1078 Lollydoodle Scrapbooking Kit
G1079 Ivy Lane Cardmaking Kit
G1080 Lollydoodle Cardmaking Kit
Complements Assortments (X7177C - X7183C)
Coordinating Assortments (Z3000 - Z3006)
15 March, 2014
Pure Joy of Washi Tape!
We are wild for washi tape! Close To My Heart has washi tape in eight
different colors and fun patterns like stripes, polka dots, chevron, and
houndstooth. Watch the video to discover tips, tricks, and the pure joy
of washi tape. Contact ME, your Independent Consultant for more
information.
Products Used
Z1923 Smoothie Striped Washi Tape
Z1920 Gold Polka-Dot Washi Tape
Z1931 Honey Triangles Washi Tape
Z1850 Lagoon Houndstooth Washi Tape
Various other Washi Tapes
Z1939 Paper Fundamentals Basics Assortment
14 March, 2014
Flip Flaps
Tip of the Day...
Do you have so many photos that you don't know how you are going to fit them all on your pages, then watch the fabulous Noreen Petty's Video - OMG you are going to LOVE THIS!! This will change the way you scrapbook from now on. Give it a go.
You can purchase these from my Online Shop.
March 2014 Newsletter!
Our NEW Ideas Book
has over 200 ideas/projects in it and Australia now has access to the entire
range of Close To My Heart Products and is fantastic value at ONLY $5 plus
postage. I am having so much fun playing and learning all about the new
releases. Our Ideas Book is exactly that, an Ideas Book. If you go
to my Online Shop www.mariannelamont.ctmh.com.au, click on Products on the Tabs at the top of the
page, click on Idea Books, click on the Feb-July 2014 Book, then click on the
pdf file next to Recipes it will give you a complete list of all the products
used in all of the examples in the Ideas Book. Isn't that
fantastic!! It also refers you to which of the Books in the How To
Patterns/Publications the layout has come from.
Host a Gathering: A night or day with friends, fun projects, and a
chance to earn free products — get all that and more for hosting a Close To My
Heart Home Gathering! You’ll have a chance to earn discounted or free products
— the higher your Gathering sales, the greater your rewards, and we’ll pay
shipping and handling on all of your Hostess Rewards. Sign up to host a Home
Gathering and your rewards are on their way! For further information on
anything in this newsletter or questions about product etc. please do not
hesitate to contact me, Marianne Lamont - Email: mtlamont52@gmail.com or
0414 782 132.
MARCH
Friday 7th 1pm - 9pm $20 includes Stamping, Card making & 3-D projects
Wednesday 19th 10am - 4pm $15
Saturday 29th 10am - 6pm $20
APRIL
Friday 11th 1pm - 9pm $20 Stamping, Card
making & 3-D projects & includes 2 card making kits (or use them on
your scrapbooking page)
Thursday 17th 10am - 4pm $15Wednesday 23rd 10am - 4pm $15
Registration for
all my workshops is essential either by email or phone
Details at bottom of this newsletter
The new look Ideas Book & Catalogue available to view from my website
There is over 200 new ideas for you to try.... Just go to http://mariannelamont.ctmh.com.au/Default.aspx ....Contact me for your introduction to CTMH
"Happy
Place"
What could be better than great products for a
great deal?
Get the Stamp of the Month set for just $5 (S1403) when you place an order of $75 or more.
You’ll find helpful assembly tips at my Online Business Address under Promotions.
Get the Stamp of the Month set for just $5 (S1403) when you place an order of $75 or more.
You’ll find helpful assembly tips at my Online Business Address under Promotions.
In love with the artwork we created with this stamp
set?
Get ready to make it yourself!
Purchase the materials listed here along with your deeply discounted Stamp of the Month set to get started!
Get ready to make it yourself!
Purchase the materials listed here along with your deeply discounted Stamp of the Month set to get started!
Materials
Needed
S1403 My Acrylix™ Happy Place
X7181B Jubilee Paper Packet
Z3000 Skylark Assortment
Z1916 Sparkles Black Flourishes–Small
Z1953 My Creations™ Journaling Cards Box
Z1971 Jubilee Textiles
Z1852 Stitch Guide
Z1906 Cricut® Artbooking Collection
S1403 My Acrylix™ Happy Place
X7181B Jubilee Paper Packet
Z3000 Skylark Assortment
Z1916 Sparkles Black Flourishes–Small
Z1953 My Creations™ Journaling Cards Box
Z1971 Jubilee Textiles
Z1852 Stitch Guide
Z1906 Cricut® Artbooking Collection

Want to learn how to make this card
& how to purchase the products?
Come along to a workshop or give me
a call for a chat
“I can show you how”
Along with the Happy
Place stamp set you can earn in March for $5, I will be featuring the Jubilee
Workshop on the Go Kit for April. So
earn your stamp set in March & come along to one of my workshops in April
& I will show you how you can brighten up your pages & cards using them.
All Workshops on the Go Kits can be viewed in the Ideas Book/Catalogue, available
for purchase NOW.
You will need to order your Jubilee Workshop on the Go Kit this month in plenty of time for the April workshop.
Consultants
enjoy 22%+ discount on all products
If your scrapbooking, card making and paper crafting desire is high and
funds are low you may like to investigate how easy it is to enjoy 22 - 35%
discounts on Close To My Heart products. I LOVE the fact ALL my inks and papers have
been FREE to me since joining. Let me show you how.
Contact me for details
Marianne Lamont
Consultant ID: 2165
Ph: 0414 782 132
Email: mtlamont52@gmail.com
Web Site: www.mariannelamont.ctmh.com,au
Subscribe to:
Posts (Atom)