30 April, 2014

National Scrapbooking Month

You're Invited to our National Scrapbooking Month Fun Day - Saturday 10th May. Come & join us for a fun day of ideas, inspiration, Giveaways, laughter & good company. contact me to register now, I would love to see you there.

Photo: You're Invited to our National Scrapbooking Month Fun Day - Saturday 10th May. Come & join us for a fun day of ideas, inspiration, Giveaways, laughter & good company.  contact me to register now, I would love to see you there.

29 April, 2014

Artbooking Made Easy: Fun in the Sun

Today marks another “transition”: this will be the final Artbooking Made Easy post.
To go out with a splash, I want to share with you some ideas on how to use the summertime-themed keys for your summer photos and memories. Get a final look at the masterful pieces you’ve come to expect in this series, along with some helpful hints on how to create similar projects by watching the video.
so whether your favorite summer vacation is camping in the woods or swimming in the ocean, the summertime-themed keys on Close To My Heart's Artbooking cartridge will have the perfect cutouts to use in recording all your unforgettable memories. Contact ME your Independent Consultant for more information.


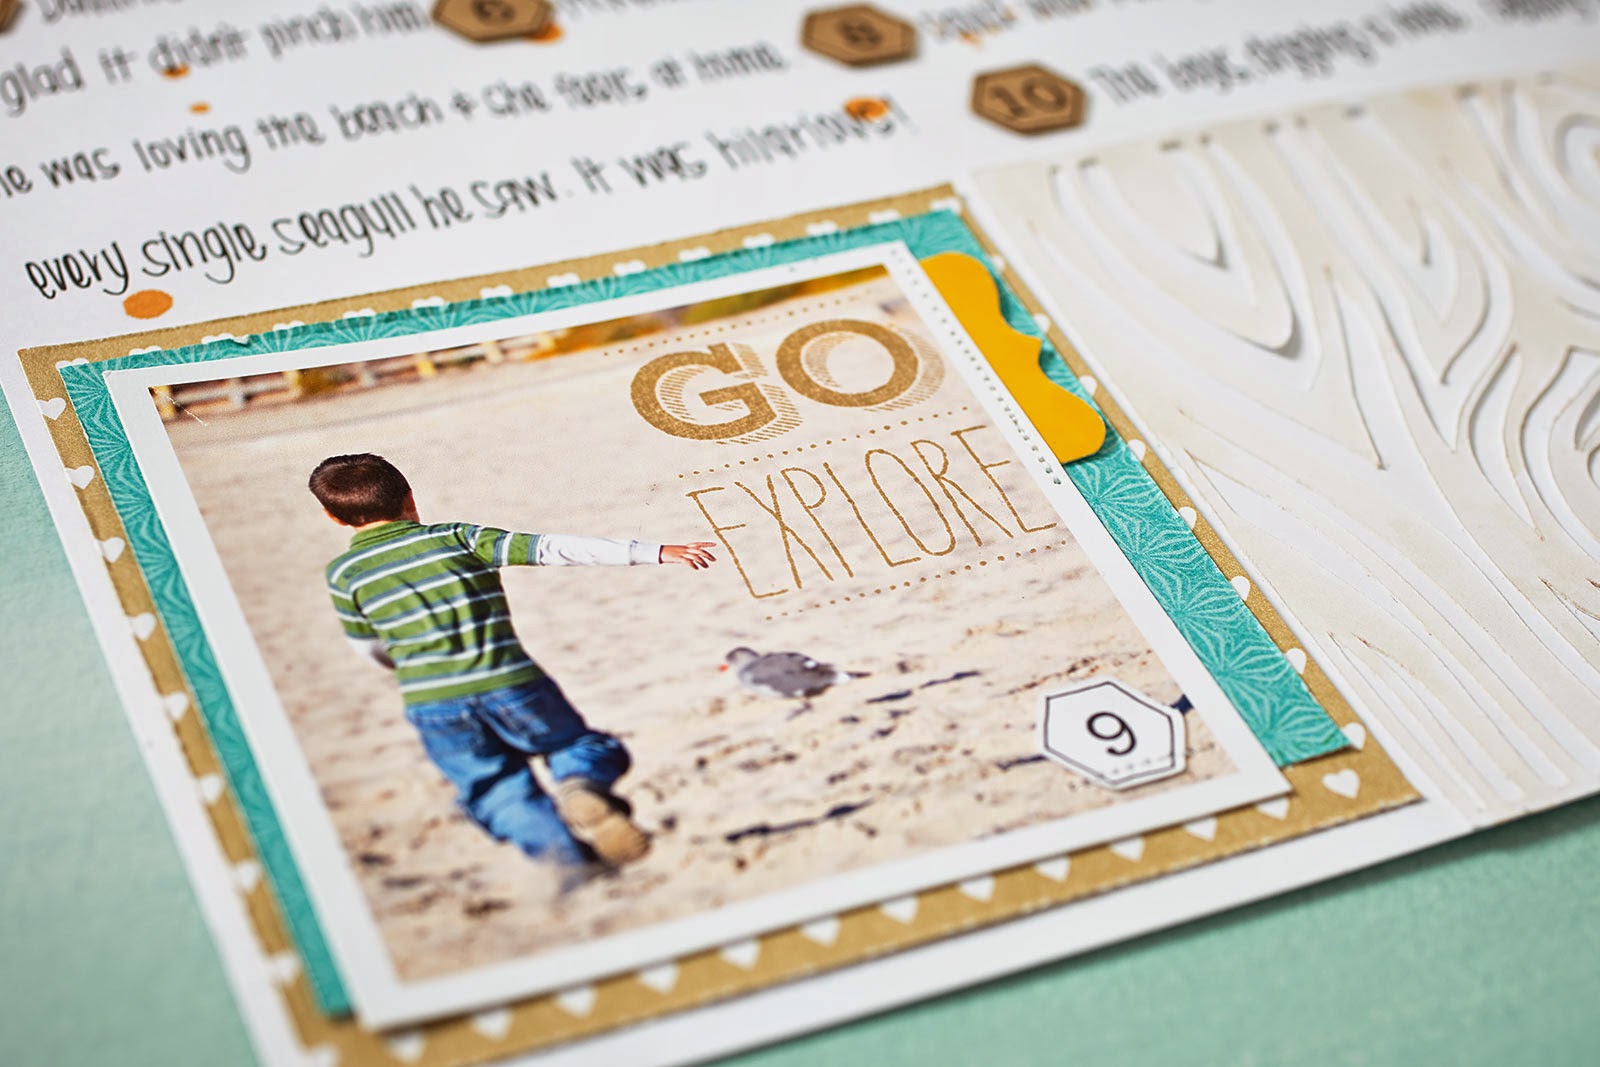
I love this Family Vacation layout, not only because it features beach scenes and embellishments (because who doesn’t love the beach?) but because it incorporates the journaling so creatively. The hexagon numbers are a fun way to match up each adorable photo with a caption, don’t you think?
There is also some fantastic layering used here. A square of B&T, a journal spot, and some cardstock turn this combo of a photo mat into much more than a photo mat—it’s a scene to behold. With the photo atop that, held in place by washi tape and stitching, and a few embellishments more, the entire piece is a little work of art all on its own.
 When you work with a busy layout like this one but have details you still want to add, make use of your photo space. Crop a photo so that the focal person isn’t precisely in the center, leaving room for a stamped sentiment or extra accessory over the open space.
Move to the next layout and you’ll notice that though a lot of the same shapes were used, yet the layouts look totally different. 

A change in size, paper, placement, and embellishment give every single shape on the Artbooking cartridge multiple looks. With 700 images on the cartridge, that means the possibilities are as high as the sky—a big, blue, open summer sky.


From one artist to another, keep dreaming! You’re as free as you let yourself be in your creativity. It’s my hope that the Cricut® Artbooking cartridge gives you all the right ingredients you need for expanding your artistic world and capturing the moments that matter most.
Recipes:
12" x 12" Sunshine Layout
Z1906 Cricut® Artbooking Collection
D1555 My Acrylix™ All the Details
Z1939 Paper Fundamentals Basics Assortment
Z1853 Aqua Dots
Z1928 Durables Triangle Studs
Z1931 Honey Triangles Washi Tape
Z1837 Mini-Medley Accents Wooden Collection
Colors Inks & Cardstock: Honey, Pear, White Daisy, Ruby, Sunset
12" x 12" Family Vacation Layout
Reflections: Front & Center–Accent Band (Alternate)™
Z1906 Cricut® Artbooking Collection
C1575 My Acrylix™ True to Life
D1580 My Acrylix™ Catch You Later
D1543 My Acrylix™ Country-Born
A1159 My Acrylix™ LOL
D1556 My Acrylix™ School Years
X7177B Skylark Paper Packet
X7179B Ariana Paper Packet
X7171B Sarita Paper Packet
Z1939 Paper Fundamentals Basics Assortment
Z1886 My Crush™ Besties Assortment
Z1887 My Crush™ Best Day Ever Assortment
Z1889 My Crush™ Favorites Assortment
Z1931 Honey Triangles Washi Tape
Z1853 Aqua Dots

Colors Inks & Cardstock: Buttercup, White Daisy, Goldrush, Whisper, Honey, Archival Black, Lagoon, Champagne, kraft


23 April, 2014

Jubilee Workshop on the Go Scrapbooking Kit

I made cards and pages for a my workshop on   Friday.  The first 2 cards are Kits included in the cost of my workshop fee.  The Life is Sweet card & the Starburst pages are samples that can be made on the day.

             The pleated card inspired by CTMH consultant Bernadette Lewin


I had alot of fun getting inky around all the edges of these cards.  The flowers are cut on the Cricut machine and then rolled using the quilling tool.
The colouring and blending with the CTMH pens is very therapeutical I found.


Want to learn these techniques and more then contact me & come along to one of my workshops and I will show you how.    
Marianne Lamont: mtlamont52@gmail.com


I used:
G1076 Jubilee Workshop on the Go Scrapbooking Kit
X7181C Jubilee Complements
B1419 Joyful Birthday Stamp Set
C1581 Inspiration Flourishes Stamp Set
D1525 Casual Expressions Occasions Stamp Set
Z1848 Red Shimmer Trim
Z1928 Durables Triangle Studs
Z1849 Bronze Shimmer Trim
Z1686 Cricut® Art Philosophy Collection
Z2116 Cranberry Exclusive Inks Stamp Pad
Z2162 Homey Exclusive Inks Stamp Pad
Z2111 Chocolate Exclusive Inks Stamp Pad
Z1807 Pink Glitter Gems
Z338 Euro Personal Paper Trimmer
Z679 Liquid Glass
Z1795 Quilling Tool
Various Close To My Heart Pens


The starburst pages inspired by CTMH consultant Susan Williams

Artbooking Made Easy: Togetherness

If you love documenting your favorite family together time, then you’re going to love today’s episode of Artbooking Made Easy. We’re going to be looking at the together layout keys on pages 60 and 61 of the Artbooking booklet. Contact ME your Independent Consultant for more information!
       
      
So whether you’re scrapbooking memories with your sweetheart, your friends, or your family, these together layout keys are perfect!


I love this overlay! As Mimi pointed out, it’s been backed with papers from several different paper packets, but they all work together so well that you wouldn’t even guess they weren’t from the same packet! This overlay is nice because you can leave the cutouts backed simply with paper, photos, stamps, or embellishments.
 
Don’t you love this beautiful stamp? It’s nice with the two-colored effect too, created by simply stamping in two different inks and then cutting out the frame from one and paper piecing it atop the sentiment.
 
 
Again, this adorable overlay is perfect to be sized down and used for a card! I also love how the “I Adore You” sentiment was dovetailed and then popped up with a double layer of 3-D foam tape to give it a realistic ribbon-like look.
 
Notice how the artist had used a frame on top of the photo, without trimming off the edges. I love how the colors work together to frame the photo but it adds a certain amount of interest to keep the edges of the photo exposed.
 
 
Mimi showed us in the video how to back the border with colorful scraps, but you could also do the same thing with the “together” banner or other cutouts from these keys, as many of them have decorative edges.
 
These two heart pennants add such a nice touch to this page. You can use some re-inker and a spray pen to add some light sprinkles of color, as you can see here on the White Daisy cardstock that’s backing the pennants. I also love the machine stitching on top! That adds a fun and unexpected detail.  


Recipes
Together Layout:
Z1906 Cricut® Artbooking Collection
B1439 My Acrylix™ Dreamer
C1581 My Acrylix™ Inspiration Flourishes
E1028 My Acrylix™ Hopscotch Alphabet
X7177B Skylark Paper Packet
Z1935 Black & Grey Epoxy Bubbles
Colors used: White Daisy, Hollyhock, Goldrush, Desert Sand
Remember Page:
Z1906 Cricut® Artbooking Collection
C1581 My Acrylix™ Inspiration Flourishes
B1443 My Acrylix™ Hello Wonderful
X7179B Ariana Paper Packet
X7177B Skylark Paper Packet
X7180B Balloon Ride Paper Packet
Z1812 Sparkles Clear Flourishes—Small
Z1752 Sparkles Clear Assortment
Colors used: Buttercup, White Daisy, Sorbet, Sweet Leaf
Together Card:
Z1906 Cricut® Artbooking Collection
B1443 My Acrylix™ Hello Wonderful
X7177B Skylark Paper Packet
X7181B Jubilee Paper Packet
X7179B Ariana Paper Packet
X7178B Ivy Lane Paper Packet
X7182B Timberline Paper Packet
Z1934 Flamingo Dots
Colors used: White Daisy, Olive, Cashmere, Hollyhock

Whether you're celebrating romance, family, or friends in your papercrafting project, you'll be head over heels for the fancy frames, ornate edges, and faux flowers from the together-themed keys on Close To My Heart's Artbooking cartridge! Contact ME your Independent Consultant for more information!


15 April, 2014

How GREAT is the Savings to join as a Consultant this month!

If you're THINKING of getting a Cricut - you will save so much money by joining "Close To My Heart" and purchasing one as a Consultant.  And as a Consultant you will be able to join all of us at the "Artistic Adventure" Close To My Heart Conference / Crafting weekend in October!!!  Send me an email & I will contact you: mtlamont52@gmail.com or go to my website & sign up from there: http://mariannelamont.ctmh.com.au/ctmh/what-we-do/be-a-consultant.aspx

Artbooking Made Easy: Capturing Snapshots

Wondering what to do with all those snapshots you have lying around? Close To My Heart's Artbooking cartridge's snapshots keys are the perfect way to assemble those photos into one oh-so-memorable mini album. Contact ME your Independent Consultant for all the details!


One of the things I love about the circle overlay is all of the fun stamping you can do with it! Jill showed us how the overlay was used as a stencil all over in this album for this fun, shaded stamp pattern. Try this out with the other overlays to pattern your paper! The best part is that you can still use the cutout, even after you’ve used it as a stencil!
The My Acrylix™ Reel Life stamp set used here comes with three arrows, so you can achieve this fun pattern by just stamping it once in four different colors, cutting out all the pieces, and arranging them however you’d like.


Recipes
Be Yourself Mini Album:
Z1906 Cricut® Artbooking Collection (cutouts and stamps)
B1431 My Acrylix™ Reel Life
X7179B Ariana Paper Packet
X7171B Sarita Paper Packet
Z1751 Baker’s Twine Harvest Assortment
Z1702 Baker’s Twine Paradise Assortment
Z1799 Silver Shimmer Trim
Z1918 Teal Shimmer Trim
Z1817 Slate Polka-Dot Washi Tape
Z1932 Silver Geometric Washi Tape
Z1935 Black & Grey Epoxy Bubbles
Z1853 Aqua Dots
Z1938 Sponge Dauber Value Pack
Colors used: Colonial White, Crème Brulee, Juniper, Outdoor Denim, Slate, Twilight,

 Of course, you can use the cutouts from these keys for other projects besides mini albums, too. On this adorable canvas, all of the shapes were cut using Real Dial Size to make them fit perfectly on the 6" x 6" canvas. The title and the circle half overlay were both cut at 2" RDS, and the photo mat cut at 4 1/2". The camera and the heart were both cut at 1 1/2" RDS. I like how the artist customized the title by leaving off the “photos” from the “My Favorite Photos” pennants on page 40 of the Artbooking booklet. 


My Favorite Canvas:
Z1906 Cricut® Artbooking Collection
X7177B Skylark Paper Packet
Z1939 Paper Fundamentals Basics Assortment
Z1818 My Creations™ 6" x 6" Canvas Display
Z1830 Brown & Tan Glitter Paper
Z1753 Sparkles Brown & Tan Assortment
Colors used: Flaxen, Sorbet, Thistle

10 April, 2014

Artbooking Made Easy: Artbooking My Life

Take your no-hassle, ready-to-use Picture My Life™ scrapbooking to the next level by incorporating various cutouts from Close To My Heart's Artbooking cartridge! Check it out here, along with charming Mother's Day gift ideas. Contact ME your Independent Consultant for more information.


I know I would love to receive a pocket-scrapbook page filled with photos of my child and grandchildren—wouldn’t you? These scrapbooking programs are amazing by themselves, but combining them with elements from the Artbooking cartridge makes them even better! Let’s take a closer look at these wonderful projects.

I love this sweet Mother's Day Picture My Life page! Monica pointed out how the shapes from the Artbooking cartridge can be sized down using the Real Dial Size feature in order to fit these smaller cards perfectly. Real Dial Size is going to be the key to making the shapes, cutouts, and titles from Artbooking work perfectly on your Picture My Life layouts.

These scrapbooking programs are so unique that no matter your scrapbooking style, you can adapt it to fit your preferences. For example, I love how the card on the bottom right acts as the journaling for the card to its left.  The cork shapes point to the picture and the kraft letters label it. And don’t you love how those little stitched hearts decorate the card? Such a nice touch. If you’re worried that the Picture My Life programs won’t give you enough room for journaling, think again! Each of the cards has journaling on one side, so there’s always plenty of room to label and write some details about your photos.

Because the Picture My Life cards are rather generic, they are also versatile enough to use for a variety of projects. But using cutouts from the Artbooking cartridge is the perfect way to add some specific details and titles to your pocket scrapbook pages and layouts, like how the artist has created this “Mothers day” title using the letters from Artbooking.

Like Monica said, one of the best parts about the Picture My Life programs is how they also coordinate perfectly with the My Reflections™ paper packets. This My Creations™ box is decorated so adorably using paper from the Skylark paper packet and a card from the Skylark Picture My Life program, but then just a few select cutouts from the Artbooking cartridge help dress it up: the arrow, pennant tab, and “cherish” title. And don’t you love that Base & Bling camera charm?

See how this box fits everything you need? And because it’s tiered, the cards are all readily accessible. Remember that you can decorate the inside of the lid, too!

Monica already pointed out the calendar on this layout and how it was sized down to fit perfectly on the card. But I like how the artist played up the calendar theme by using a card with the months of the year, and by journaling highlights from the 1st year of marriage.

One idea from this page is to add a cutout from the Artbooking cartridge to a blank journaling card. If you don’t have anything specific to add journaling for on a page, an Artbooking title might be just enough to dress up the card.
Another smart idea: if you find that your pictures just don’t quite match your color scheme, you can always try printing them out in black and white or with a sepia finish.
So please enjoy getting those Mother’s Day gifts ready, and go ahead and try incorporating Artbooking into your own Picture My Life projects!

Recipes

Mother’s Day Page:
Z1906 Cricut® Artbooking Collection
D1578 My Acrylix Flight of the Arrows
X7177B Skylark Paper Packet
Z1947 Picture My Life Skylark Scrapbooking Program
Z3000 Skylark Assortment
Z1853 Aqua Dots
Z1825 Keyboard Kraft Alphabet
Z1863 Midtown Cork Shapes
Z1850 Lagoon Houndstooth Washi Tape
Colors used: White Daisy, Sweet Leaf, Lagoon, kraft
Journaling Cards Box:
Z1906 Cricut® Artbooking Collection
X7177B Skylark Paper Packet
Z1947 Picture My Life Skylark Scrapbooking Program
Z1702 Baker’s Twine Paradise Assortment
Z1853 Aqua Dots
Z1958 Base & Bling Craft Queen Charms
Z1928 Durables Triangle Studs
Z1825 Keyboard Kraft Alphabet
Apple of My Eye Layout:
Z1906 Cricut® Artbooking Collection (cutouts and stamps)
D1574 My Acrylix Take Note
D1555 My Acrylix All the Details
Z1942 Picture My Life Avonlea Scrapbooking Program
Z1853 Aqua Dots
Z1918 Teal Shimmer Trim

Colors used: Colonial White, White Daisy, Juniper, Lagoon, Outdoor Denim, black, kraft

08 April, 2014

Sayings!


Floating Your Fancy

Get the most out of Close To My Heart's Cricut® Artbooking cartridge with these fun home décor ideas. Create decorative floating frames and functional message boards quickly and easily. Contact ME your Independent Consultant for more information.

  
 Products Used
Z1906 Cricut Artbooking Collection
Z1279 Versa Mat
X5635 Topiary Cardstock
X5639 Sweet Leaf Cardstock
X5666 Twilight Cardstock
X7183B Lollydoodle Paper Packet
Z2117 Crystal Blue Exclusive Ink Stamp Pad
Z2160 Twilight Exclusive Ink Stamp Pad
Z2193 Cotton Candy Exclusive Ink Stamp Pad
Z2190 Gypsy Exclusive Ink Stamp Pad